
This week is all about addressing a really specific scenario and that scenario is related to the Microsoft Store. Many organizations are preventing access to the Microsoft Store app by using the policy setting Turn off the Store application. That policy setting, however, does literally what the name implies, it turns off the Store application. That does not prevent users from navigating to apps.microsoft.com, downloading an app and installing it directly. In the early days that download option did not exist, meaning that this scenario did not exist. That all changed with the Microsoft Store Web Installer. The Microsoft Store Web Installer is a standalone installer for Store apps that helps with downloading and installing apps from apps.microsoft.com. It basically creates a stub .exe-based installer for the app that can be downloaded locally. A nice solid and secure solution that can be easily used for custom (inhouse) apps. The challenge, however, is that it also introduces a challenge when trying to control app installations from the Microsoft Store. Every available policy is focused on the local Microsoft Store and not on apps.microsoft.com. This post will show a method to address this specific behavior, by using Entra Internet Access.
Important: This post only describes a solution that addresses the specific behavior. For a real solution, that actually addresses application installation in the broad sense, please look at using Application Control.
Note: Entra Internet Access is just an example, and that could be any other solution to block a specific URL.
Filtering web content to block the Microsoft Store Web Installer
When looking at filtering web content by using Entra Internet Access, it actually requires multiple steps. That of course all starts with actually enabling internet access traffic forwarding. The assumption for now is that it is already in place, as it is part of the basics for getting started with Entra Internet Access. Once that is done, blocking specific web content is a three step process. The web content filtering policy, the security profile, and the Conditional Access policy.
Configuring the web content filtering policy
The first step in that process is creating a web content filtering policy. A web content filtering policy contains the different web content filtering rules that should be applied to achieve specific behavior. The following five steps walk through the process of creating a web content filtering policy that is used to specifically block get.microsoft.com. That specific url is documented as the location to block to prevent the installer from being downloaded and executed from the Microsoft Store website.
- Open the Microsoft Entra admin center portal and navigate to Global Secure Access > Secure > Web content filtering policies
- On the Web content filtering policies page, click Create policy
- On the Basics page, specify a unique clear name, select Block as action, and click Next
- On the Policy Rules page, as shown below in Figure 1, add a rule with the following configuration and click Next
- Name: Specify a unique name for the rule
- Destination type: Select fqdn as the destination type
- Destination: Specify get.microsoft.com as the destination that should be blocked

- On the Review page, verify the configuration and click Create policy
Note: It is also possible to add this specific location to an existing web content filtering policy.
Configuring the security profile
The second step in that process is creating a security profile. A security profile is a grouping of one or more web content filtering policies, including prioritization. That security profile can eventually be assigned to web content. The following five steps walk through the process of creating a security profile that is used for the web content filtering policy.
- Open the Microsoft Entra admin center portal and navigate to Global Secure Access > Secure > Security profiles
- On the Security profiles page, click Create policy
- On the Basics page, specify a unique clear name, select Enabled as state, 100 as priority, and click Next
- On the Link policies page, as shown below in Figure 2, link a policy with the following configuration and click Next
- Policy name: Select the just created web content filtering policy
- Priority: Specify the priority for this web content filtering policy
- State: Select On to enable the web content filtering policy
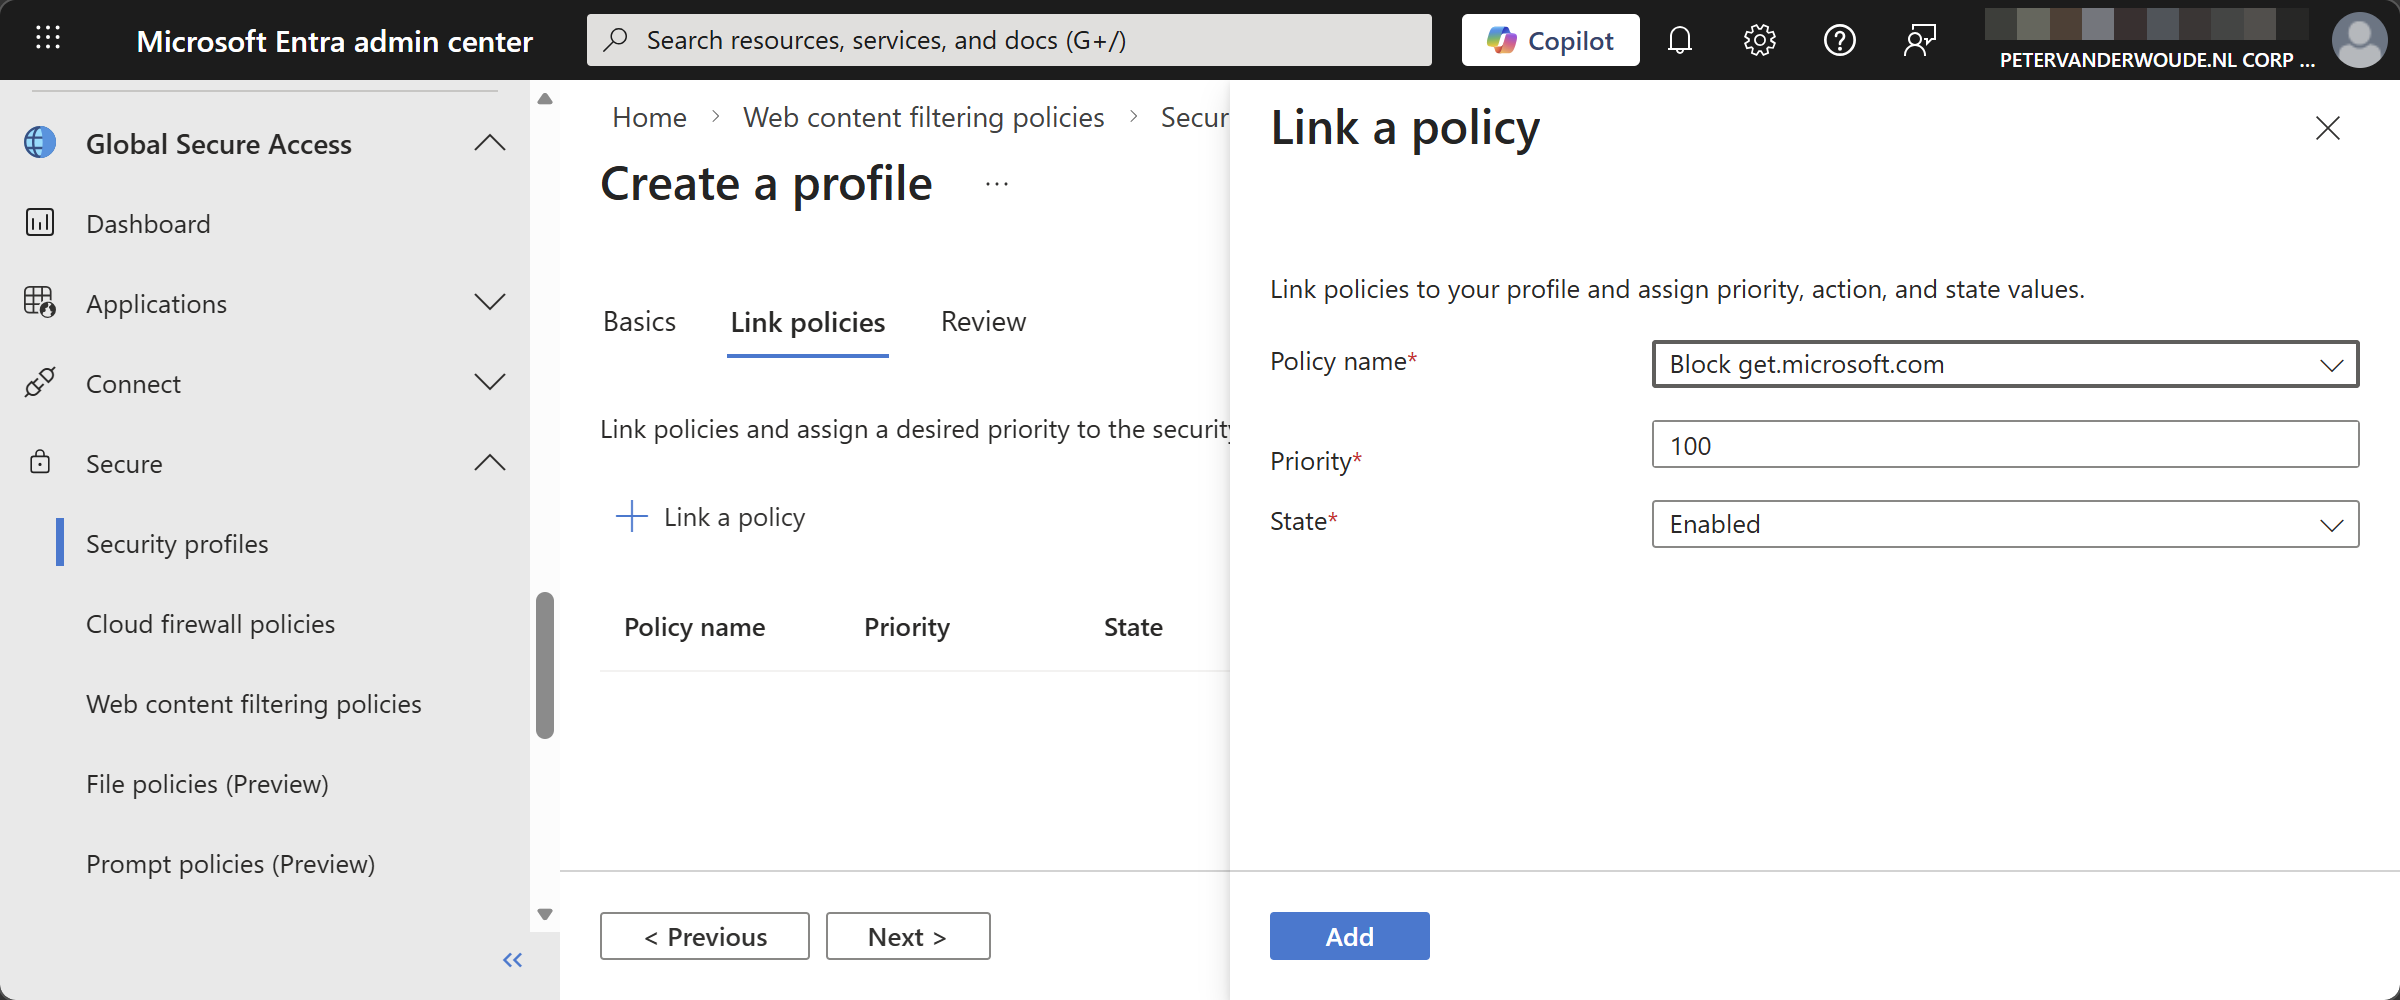
- On the Review page, verify the configuration and click Create a profile
Note: It is also possible to add the web content filtering policy to an existing security profile.
Creating the Conditional Access policy
The third and last step in that process is creating a Conditional Access policy and linking it to the security profile. The Conditional Access policy is the delivery mechanism for user and context awareness for Entra Internet Access policies. The following three steps walk through the process of creating a Conditional Access policy that is used for delivering the security policy.
- Open the Microsoft Entra admin center portal and navigate to Entra ID > Conditional Access
- On the Conditional Access | Overview page, click Create new policy
- On the New page, as shown below in Figure 3, specify at least the following configuration and click Create
- Assignment
- Users or agents: Select the users that should be targeted with this configuration
- Targeted resources: Select All internet resources with Global Secure Access
- Network: Configure any network specific filters that should apply
- Conditions: Configure any additional filters that should apply as conditions
- Access controls
- Grant: Leave this configuration untouched
- Session: Check Use Global Secure Access security profile and select the just created security profile
- Enable policy: Select On to turn the policy on

Experiencing the blocked Microsoft Store Web Installer
When the configuration is in place, it is pretty straightforward to experience the behavior. Simply navigate to apps.microsoft.com and try to download any application that is available. All of those actions should result in the behavior as shown below in Figure 4. Once clicking download, the action will not continue as the Global Secure Access client will block the traffic towards get.microsoft.com. Instead, the Microsoft Store app will be opened. In combination with the policy setting Turn off the Store application, the Microsoft Store app will be opened with the message that it is blocked.

More information
For more information regarding the Microsoft Store Web Installer, refer to the following docs.
- How to use the Microsoft Store Web Installer to distribute your apps on the web. – Windows apps | Microsoft Learn
- Configure Access To The Microsoft Store App For Windows Devices | Microsoft Learn
Discover more from All about Microsoft Intune
Subscribe to get the latest posts sent to your email.
This can have negative impact to something related to intune app distribution?
No, the Intune app distribution does not rely on that URL. I’ve verified successful Intune app deployments using the Microsoft Store.
Regards, Peter
Hi peter,
also as the app is available? or only required apps because company portal links to the stoe if you make apps available.
Yes! Also when the app is available.
Regards, Peter
Hi Peter,
Would this method also block the command line tool winget, do you know?
Not everything, only that specific route. There are separate policies for managing Winget.
Regards, Peter
I have implemented a policy blocking get.microsoft.com via Indicators in MDE. If I try to browse to get.microsoft.com in Edge I get the block page to indicate the indicator has applied and is blocked.
This doesnt seem to prevent me from browsing to apps.microsoft.com and downloading and installing spotify successfully though?
Hi PJR_CDF,
Not completely sure when using indicators, but with Internet Access the configuration will make sure that you can still browse to apps.microsoft.com, however, when trying to download an app the user will be redirected to the Store app (as the Web Installer route is blocked).
Regards, Peter
Interesting, as blocking a URL via an Indicator in MDE should be no different to doing so in Entra Internet Access?
I also tested by creating an Intune policy to block access to get.microsoft.com via Edge (confirmed when attempting to browse to it) and this didnt prevent installation either?
As your article states “Note: Entra Internet Access is just an example, and that could be any other solution to block a specific URL”.
Based on my testing at least I dont think that’s the case?
I would think so, but like I mentioned, I’m not sure about that.
The browser configuration won’t work, as that will only work for traffic directly through the browser. Anything else won’t be blocked.
Regarding the note; I was mainly referring to similar technical solutions as Entra Internet Access from competitors. Apologies if that was not totally clear.
Regards, Peter