This week is all about getting started with Windows 365 Cloud Apps. Not something really new, but definitely a simple IT administrator experience that is worth highlighting. Cloud Apps provides IT administrators with the ability to easily provide users with secure access to specific apps only, that are hosted on a Cloud PC. And that access is without the need for a dedicated Cloud PC for those users. That functionality relies on Windows 365 Frontline in shared mode. So, that also means that this functionality requires Windows 365 Frontline licenses. Keep in mind that, even though the name might imply something different, this license is not directly related to any Microsoft 365 F1 or F3 license. The best part of it is, that it has the same simple IT administrator experience as known from Cloud PCs. No infrastructure planning, just focus on the user experience. This post will start with a brief introduction, followed with the configuration and user experience.
Important: Windows 365 Cloud Apps relies on the Windows 365 Frontline licenses.
Introducing Windows 365 Cloud Apps
Windows 365 Cloud Apps is basically a really simple and straightforward method to publish apps to users. To access those apps, users can rely on the Windows app. Just like with Cloud PCs. Main difference is that the user only has specific apps available, instead of a full desktop. To provide that functionality, Cloud Apps relies on Windows 365 Frontline licenses. That also mean that the same limitations are applicable. In other words, the maximum number of active Cloud Apps sessions is equal to the number of Windows 365 Frontline licenses. Besides that, Cloud Apps relies on the underlying Windows 365 Frontline Cloud PCs that are running in shared mode. So, everything that is applicable to those Cloud PCs is also applicable to the Cloud Apps that are published from those Cloud PCs. For publishing apps from those Cloud PCs, the Start Menu will be scanned. All the apps that are available via the Start Menu will become available for publishing.
When actually publishing apps from the Cloud PC, it is important to keep i mind that the published app can also open other apps that are available on the Cloud PC. Even when that app is not published. To control that, look at App Control for Business.
Note: At this moment, applications in Appx, MSIX, Windows Store format are not discovered for publishing.
Creating Windows 365 provisioning policy
When looking at publishing Windows 365 Cloud Apps, it all starts with a Windows 365 provisioning policy. That provisioning policy can be used to provision Cloud PCs that can be used for publishing apps. That policy determines the configuration of the Cloud PCs. And that includes important configurations, such as the licensing, the network, the join type, the region, and the image. The network is important as it determines the resources that can be accessed, and the image is important as it determines the apps that will be available for publishing. The following seven steps walk through the required steps for provisioning Cloud PCs for publishing required apps. For this example, the default Microsoft configurations will be used with a gallery image. The eventual apps that can be published are currently limited to the apps that are available within the image.
- Open the Microsoft Intune admin center portal and navigate to Devices > Windows 365 > Provisioning policies
- On the Provisioning policies tab, click Create policy
- On the General page, as shown in Figure 1, provide the following information and click Next
- Name: Provide a name for the provisioning policy to distinguish it from other similar policies
- Description: (Optional) Provide a description for the provisioning policy to add additional details
- Experience: Select Access only apps which run on a Cloud PC to facilitate publishing apps
- License type: For publishing apps, Frontline is already preselected
- Frontline type: For publishing apps, Shared is already preselected
- Join type: Select Microsoft Entra Join to make sure that the Cloud PC will join Entra ID
- Network: Select Microsoft hosted network to rely on the default network configuration
- Geography: Select the geography that correspond to the organization
- Region: Select the required region to make sure that the Cloud PC is in the right region
- Check Use Microsoft Entra single sign-on to facilitate single sign-on if needed

- On the Image page, provide the following information and click Next
- Image type: Select Gallery image to rely on a standard image for the Cloud PC and the apps
- Select Windows 11 Enterprise + Microsoft 365 Apps 25H2 as image to rely on the latest available platform
- On the Configuration page, provide the following information and click Next
- Language & Region: Select the required language to relate the Cloud PC to the country
- Check Apply device name template to actually apply a custom naming convention to the Cloud PCs
- Autopilot Device preparation policy: Optionally select the preparation policy to prepare for usage
- Check Enable user experience sync to enable the user experience sync
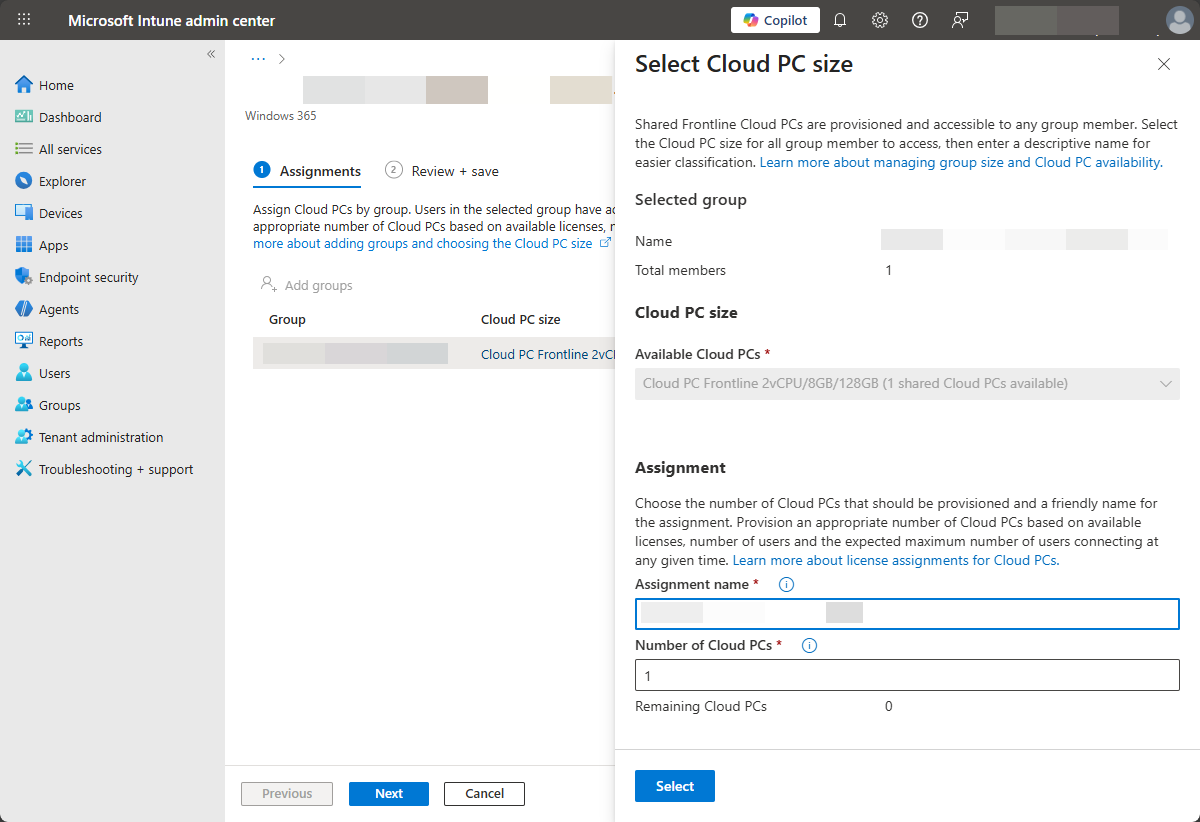
- On the Assignments page, as shown in Figure 2, specify the following configuration and click Next
- Specify the available license, the assignment name and the number of Cloud PCs to provision
- On the Review + create page, verify the configuration and click Create
Note: For more advanced scenarios, that would require a custom image, make sure to first add Custom images.
Publishing Windows 365 Cloud Apps
Once the Windows 365 provisioning policy is created, and assigned, it will automatically start with provisioning Cloud PCs. As a part of that provisioning process, the Start Menu will be scanned for available apps. The apps that are found during that process will be shown as available Cloud Apps and can be published to the users that are assigned with the provisioning policy. The following two steps walk through the straightforward steps for publishing Cloud Apps and making them available.
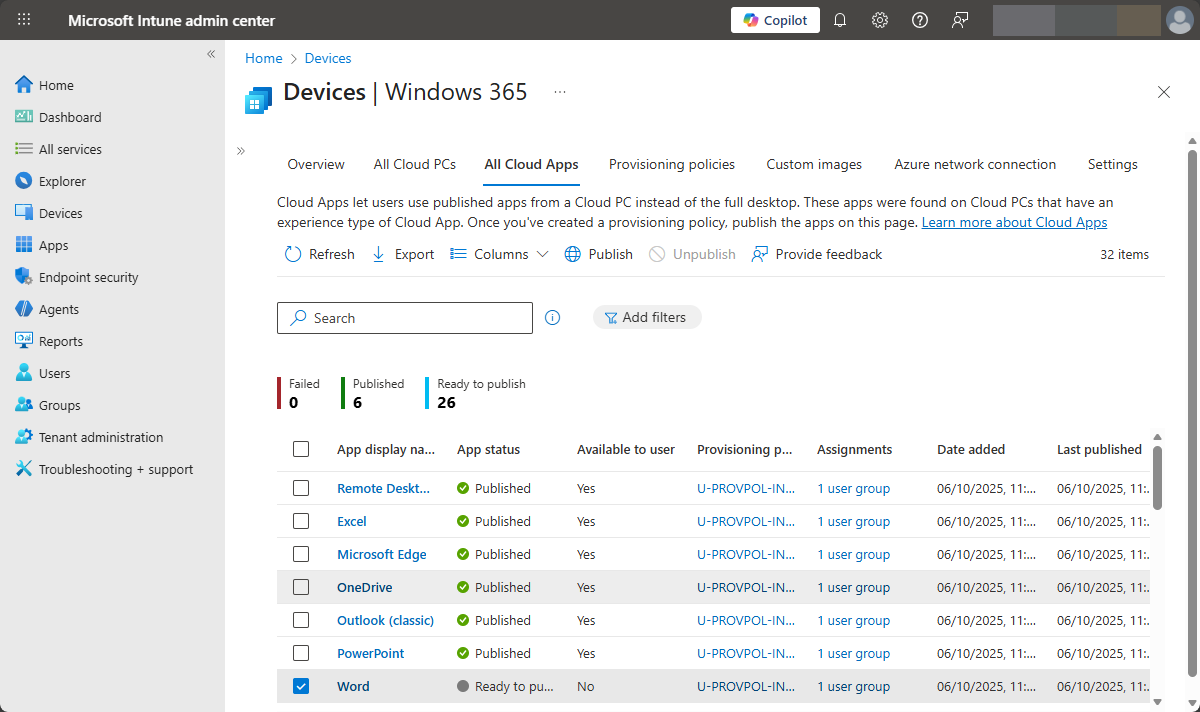
- Open the Microsoft Intune admin center portal and navigate to Devices > Windows 365 > All Cloud Apps
- On the All Cloud Apps tab, as shown in Figure 3, select the app that should be published and click Publish
Experiencing Windows 365 Cloud Apps
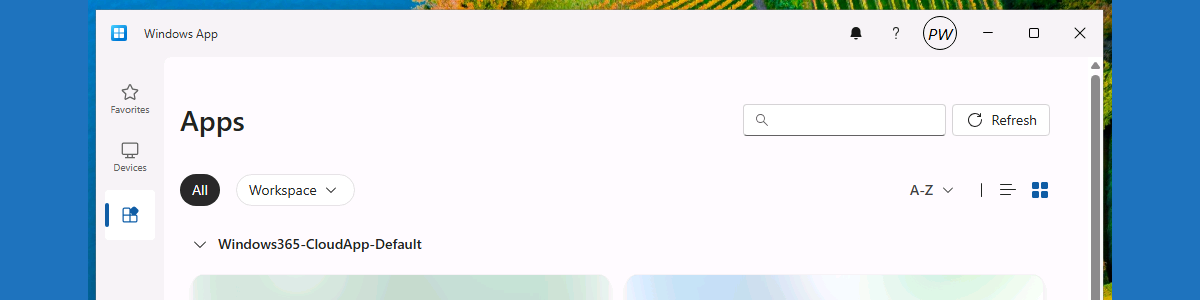
The user experience is really easy to verify! For that the Windows App is required and that app is available in the Microsoft Store. After installing the app, the user can sign-in with their work or school account to get access to the published Cloud Apps and Cloud PCs. That is even possible for multiple environments. The app provides access to the Cloud PCs via the Devices node, and to the Cloud Apps via the Apps node (as shown below in Figure 4). Now simply select one of the available apps to experience the behavior. Besides that, it is also really easy to different the local apps from the published apps, as those apps will have the Windows App icon in the top right of their own icon.

More information
For more information about Windows 365 Cloud Apps and related resources, refer to the following docs.
- Windows 365 Cloud Apps | Microsoft Learn
- Windows 365 Frontline licensing | Microsoft Learn
- What is Windows 365 Frontline? | Microsoft Learn
Discover more from All about Microsoft Intune
Subscribe to get the latest posts sent to your email.
2 thoughts on “Getting started with Windows 365 Cloud Apps”