This week is all about the new feature that was recently introduced in Endpoint Privilege Management (EPM), and that feature is the ability to elevate as the current user. Elevating files, or processes, as the current user enables it to run under the signed-in user account. That enables organizations to address one of the last gaps in the product, which is being able to access personal files while running elevated files, or processes. That means that it is actually running in the user context for that specific action, instead of using the virtual account that is normally used in EPM. It maintains the same user identity. That provides the user with access to the user profile, environment variables, and personalized settings, but also keeps audit trails consistent. This post will look into configuring an elevation rule for running a process in user context, followed with the user experience.
Configuring elevate as current user elevation rule policy
When looking at configuring an elevation rule, it’s all about an Elevation rules policy. That is of course assuming that an Elevation settings policy is already in place for setting the default behavior for elevation requests for any file that isn’t specifically managed by an elevation rule. On top of that elevation rules can be used for specific behavior, such as allowing specific files, or processes, to run as the current user. The following eight steps walk through the configuration of that elevation rules policy for an example application (PowerShell.exe), based on the hash of the file. That example provides an easy look at the behavior.
- Open the Microsoft Intune admin center portal navigate to Endpoint security > Endpoint Privilege Management
- On the Policies tab of the Endpoint security | Endpoint Privilege Management page, click Policies > Create Policy
- On the Create a profile page, provide the following information and click Create
- Platform: Select Windows 10 and later as value
- Profile: Select Elevation rules policy as value
- On the Basics page, specify a valid name to distinguish the policy from other similar policies and click Next
- On the Configuration settings page, as shown below in Figure 1, add a new rule or edit the default instance, provide at least the following information and click Next
- Rule name: Specify a valid and unique name to distinguish the rule
- Elevation type: Select Elevate as current user to make sure that this rule will enable elevating PowerShell in user context
- Validation: Select Windows authentication as the validation method for this elevation
- Child process behavior: Select Deny all to prevent the user from using PowerShell as the backdoor for all elevation
- File name: Specify the name of the file, including the extension (in this case powershell.exe)
- Signature source: Choose Not configured, to not use a certificate to validate the integrity of the file
- File hash: Specify the hash of the executable of PowerShell (in this case 0FF6F2C94BC7E2833A5F7E16DE1622E5DBA70396F31C7D5F56381870317E8C46)

- On the Scope tags page, configure the required scope tags and click Next
- On the Assignments page, configure the required assignment by selecting the applicable group and click Next
- On the Create + Review page, review the configuration and click Create
Note: Use Get-FileHash, or the Endpoint elevation report (when using the reporting scope of Diagnostic data and all endpoint elevations) to easily retrieve the hash information of the file.
Experiencing elevate as current user elevation rule policy
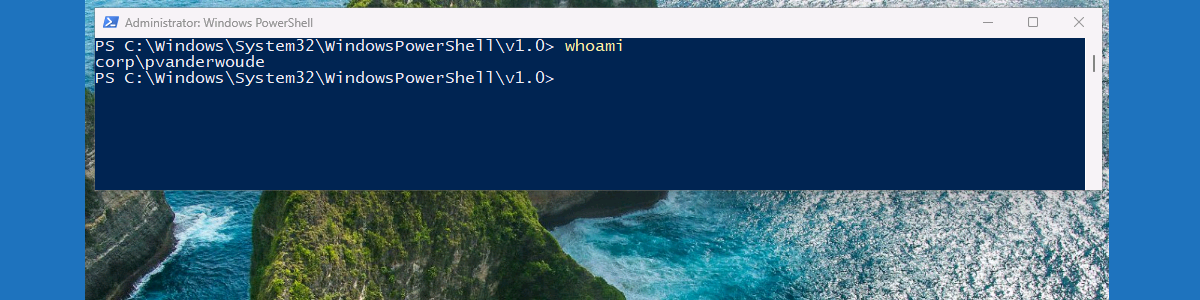
After applying the configuration, it’s pretty straightforward to experience the behavior. The EpmTools PowerShell module could be used as a pretty straightforward method to verify the applied configuration, by using Get-ElevationRules. In this case, however, it is a lot better to actually show the difference in the context of the user. That is also the main reason for using PowerShell as an example. Within the current configuration, only the x64-version of PowerShell is allowed to be elevated in the context of the user. The x86-version of PowerShell is part of the default policy that in this case allows normal elevations. The difference in behavior is shown below in Figure 2. The first will actually show the current user using PowerShell as administrator, while the second will show the separate shadow account of EPM using PowerShell as administrator.

More information
For more information about Endpoint Privilege Management, refer to the following docs.
- Learn about using Endpoint Privilege Management with Microsoft Intune | Microsoft Learn
- Configure policies to manage Endpoint Privilege Management with Microsoft Intune | Microsoft Learn
Discover more from All about Microsoft Intune
Subscribe to get the latest posts sent to your email.
Can EPM elevate an AppX/UWP application, such as Terminal or CalculatorApp? I have not been successful, even when using “Elevate as Current User.”
At this moment this is the list of supported file types: https://learn.microsoft.com/en-us/intune/intune-service/protect/epm-overview#supported-file-types
Regards, Peter