This week is a follow-up on a post of about a year ago about using the automatic account management mode of Windows LAPS. That time the post was all focused on the preview functionality that was available within Windows and that could be configured by using custom configuration profiles. This time it’s all about the general available functionality in Windows and Microsoft Intune. Windows LAPS can be used to help organizations with securing the built-in local administrator account that is available on each Windows device. The account management mode provides more flexibility on top of that, as it can be used for creating, configuring and managing a specific target account. That includes the ability to configure the target account, randomizing the account name, and configuring a specific prefix for the account name. All of those features are focused on even better protecting and managing local administrator accounts. This post will focus on easier managing the account management mode, by starting with a brief overview of the different account management modes and the corresponding configuration options. This post will end with the steps to configure the account management mode of Windows LAPS and the experience with that configuration.
Important: Account management modes are available in Windows 11, version 24H2 and later.
Managing account management mode for Windows LAPS
The account management modes for Windows LAPS are available in Windows 11 version 24H2 and later, and the integrated configuration capabilities are available in since Microsoft Intune service release 2503. With these updates, the IT administrator gets the ability to easily configure the account management mode for the specified target account. Before looking at the configuration options, let’s start with a brief summary of the available account management modes for Windows LAPS:
- Manual account management: The manual account management mode is the default mode. Within the manual account management mode, the IT administrator is responsible for all the configuration aspects of the targeted account.
- Automatic account management: The automatic account management mode is an optional mode. Within the automatic account management mode, Windows LAPS is responsible for all configuration aspects of the targeted account.
After being familiar with the available account management modes for Window LAPS, it’s important to understand the available configuration options. Those configurations are available within the LAPS CSP in Windows 11 version 24H2 and later. Within that CSP the following settings are available to configure everything around the account management mode:
- The setting Automatic Account Management Enabled (AutomaticAccountManagementEnabled) can be used to enable automatic account management.
- The setting Automatic Account Management Enable Account (AutomaticAccountManagementEnableAccount) can be used to enable the automatically managed account.
- The setting Automatic Account Management Name Or Prefix (AutomaticAccountManagementNameOrPrefix) can be used to configure the name or prefix of the managed local administrator account.
- The setting Automatic Account Management Randomize Name (AutomaticAccountManagementRandomizeName) can be used to configure that the account name uses a random numeric suffix each time the password is rotated.
- The setting Automatic Account Management Target (AutomaticAccountManagementTarget) can be used to configure the target account that is automatically managed.
Note: The Automatic Account Management Enabled setting is a requirement for configuring the other setting.
When the configuration options for the automatic account management of Windows LAPS are familiar, it’s time to look at the configuration options within in Microsoft Intune. The good thing is that those settings are now available as part of the Local admin password solution (Windows LAPS) profile, which is a part of the account protection configurations. The following eight steps walk through the configuration of that profile and focusses on the account managed mode configuration.
- Open Microsoft Intune admin center and navigate to Endpoint security > Account protection
- On the Endpoint security | Account protection page, click Create Policy
- On the Create a profile page, provide the following information and click Create
- Platform: Select Windows 10 and later as value
- Profile: Select Local admin password solution (Windows LAPS) as value
- On the Basics page, specify a valid name to distinguish the policy from other similar policies and click Next
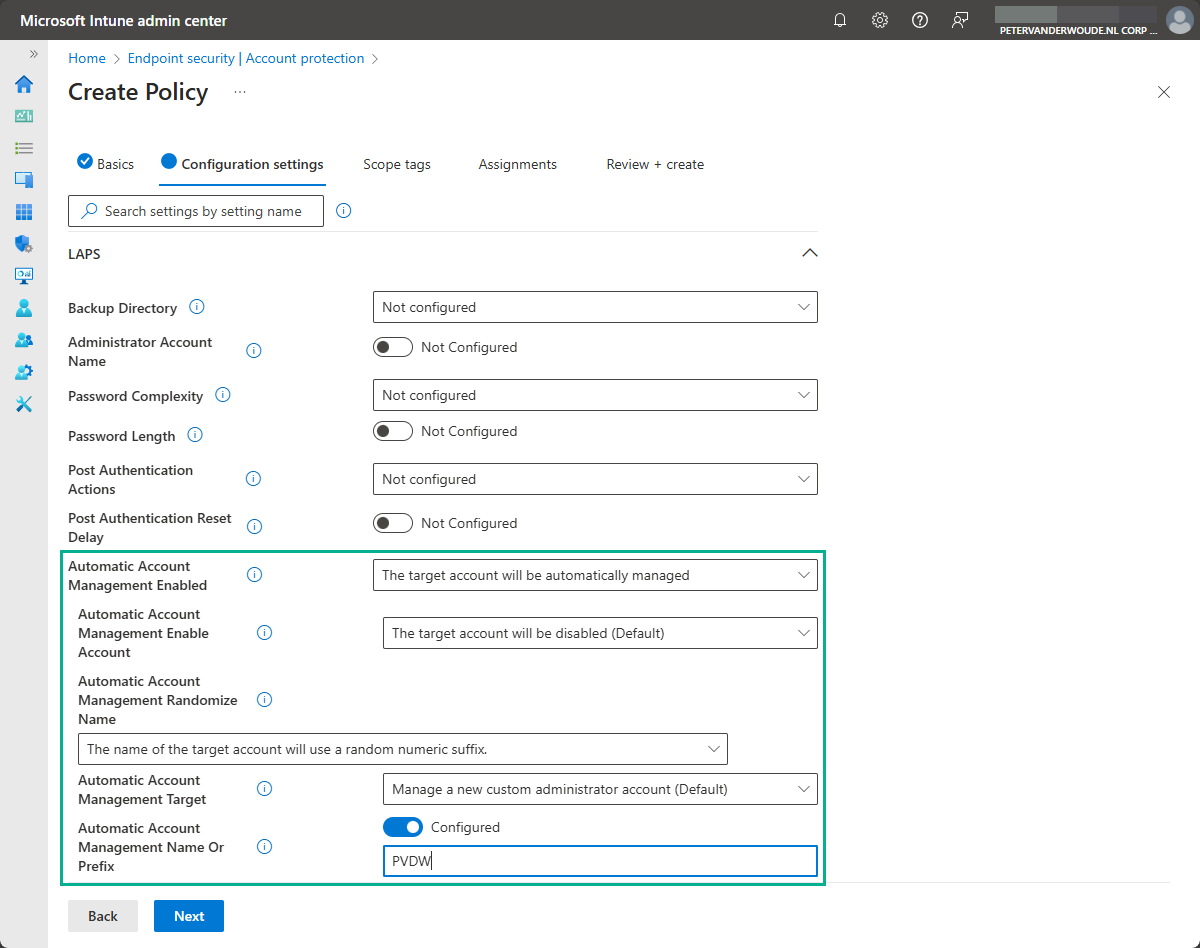
- On the Configuration settings page, as shown below in Figure 1, provide at least the following information and click Next
- Automatic Account Management Enabled: Select The target account will be automatically managed to enable the automatic account management mode for the targeted account
- Automatic Account Management Enable Account: Select Target account will be disabled (Default) to disable the targeted managed account
- Automatic Account Management Randomize Name: Select The name of the target account will use a random numeric suffix to automatically randomize the account name after a password rotation
- Automatic Account Management Target: Select Manage a new custom administrator account (Default) to manage a custom administrator account instead of the default built-in local administrator account
- Automatic Account Management Name Or Prefix: Switch the slider to Configured and specify a custom prefix to configure a specific prefix that is used for the managed account
Note: The focus for this post is the account management configuration, but don’t forget to configure the basics (backup directory, password details, and post authentication behavior).
- On the Scope tags page, configure the required scope tags and click Next
- On the Assignments page, configure the required assignment by selecting the applicable group and click Next
- On the Create + Review page, review the configuration and click Create
Note: The applied configuration is stored in the registry at HKEY_LOCAL_MACHINE\SOFTWARE\Microsoft\Policies\LAPS.
Experiencing automatic account management mode of Windows LAPS
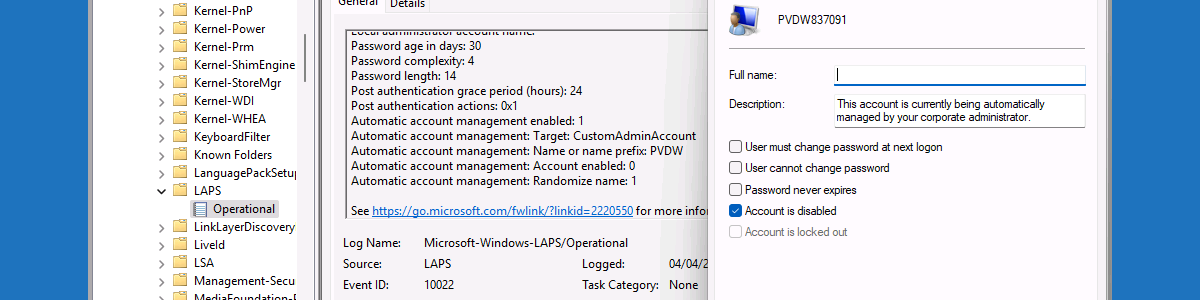
After applying the account management mode configuration for Windows LAPS, it’s interesting to see what the behavior is on Windows 11 devices. The best place to first verify the applied configuration, is by looking at Event ID 10022 in the Microsoft-Windows-LAPS/Operational log in the Event Viewer. That event provides an overview of the applied configuration details. Now simply look at the Local Users and Groups in Computer Management and verify that the automatic managed account is available conform the specified configuration. Below in Figure 2 is a clear example. A custom admin account is targeted. That account is created with a randomized name (837091) with a specific prefix (PVDW) and is disabled.
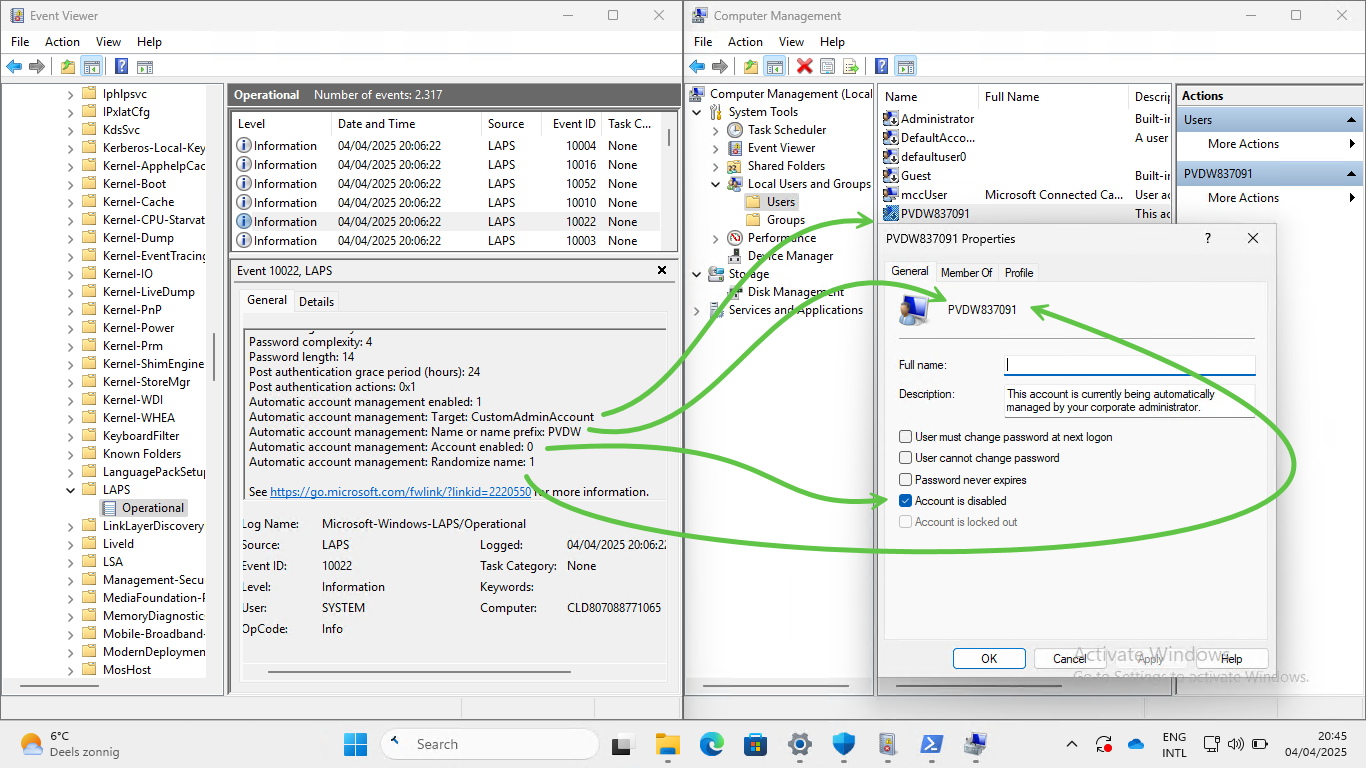
Note: Every change to the managed account will be prevented. When the user tries to make changes to that account, the following message will be shown: “The account is controlled by external policy and cannot be modified“.
More information
For more information about Windows LAPS and the account management options, refer to the following docs.
- Windows LAPS architecture | Microsoft Learn
- Windows LAPS account management modes | Microsoft Learn
- Windows LAPS passwords and passphrases | Microsoft Learn
- LAPS CSP – Windows Client Management | Microsoft Learn
Discover more from All about Microsoft Intune
Subscribe to get the latest posts sent to your email.
Peter, once again you’ve delivered an exceptionally clear and thorough article. Every time there’s an important Intune feature that needs proper attention, you’re the person I rely on to get it configured right. This post about managing account management modes for Windows LAPS is no exception — the way you break down the complexity and provide real-world configuration guidance is invaluable.
Your explanations are always solid, practical, and straight to the point. Thank you for continuing to share your knowledge so generously with the rest of us!
Thank you for those kind words, Leif!
Regards, Peter
I have a problem. I have configured LAPS policy but i’ts not aplied with a cusom account name because all lapstops, when enrolled, are Windows 11 23H2. The policy will change the password for default administrator account but won’t enable it.
When laptops update to Windows 11 24H2, 80 % of the laptops does not have the custon admin account. I don’t know when the policy will reapply and create the custom admin account.
I’m not fully understanding. Is your policy also configuring a custom administrator account, or do you have a separate policy for that?
Regards, Peter
I have only one policy. On 23H2 laptops the policy will change the password for Windows bulit-in administrator account but does not enable it. On 24H2 laptops the policy will create the custom myadmin account, enable it and change the password.
LAPS POLICY in Intune > Endpoint security > Account protection
Backup Directory: Backup the password to Microsoft Entra ID only
Password Age Days: 180
Password Complexity: Large letters + small letters + numbers
Password Length: 12
Post Authentication Reset Delay: 24
Automatic Account Management Enabled: The target account will be automatically managed
Automatic Account Management Randomize Name: The name of the target account will not use a random numeric suffix.
Automatic Account Management Name Or Prefix: myadmin
Automatic Account Management Enable Account: The target account will be enabled
Automatic Account Management Target: Manage a new custom administrator account
About 80 laptops was enrolled when those were on version 23H2. Now those have updated to 24H2 but for most of the laptops Intune shows that the LAPS account is Administrator and I cannot log in with this accoubnt because it’s not enabled. Some laptops show myadmin account and login works.
Now I have one laptop on my desktop and could not login because there was no myadmin account. I pressed Rotate Local Admin Password in Intune for that device -> myadmin account was created and the account and password is shown in Intune. Maybe I should set the password age to eg. 7 days to make this happen automatically and sooner than 180 days which is now configured. The laptops which have myadmin account were enrolled about three months ago so the account was updated sooner than 180 days.
I considered using the built-in administrator account and enabling it by an additional policy but couldn’t figure out how to make sure that the account is enabled only after the LAPS policy has changed the password.
So, basically, the policy is not reapplied when upgrading from 23H2 to 24H2, and the policy keeps the same successful status. The only thing I could think of is to trigger an update by making an adjustment to the policy…
Regards, Peter
Hello Peter,
Can you see the account name under the device -> local admin password if you enable the automatic account management and randomize the account name?
Thank you for your invaluable blog!
Hi Michaël,
You need to enable the Entra setting (Enable Local Administrator Password Solution (LAPS)) first and make sure that you are storing the information in Entra. After that, the answer is yes.
Regards, Peter
Thank you Peter, I’ve used LAPS before but only for generating a password. I was curious whether it would show the randomly generated admin account as well. Thanks!
What’s the point of this if it disables the account?
Hi Peter,
In that case, the idea is to make sure that all the passwords are complex, long and different.
Regards, Peter