
This week is all about a new feature that was recently introduced in Endpoint Privilege Management (EPM), and that feature is the ability to explicitly deny elevation. Explicitly denying the elevation blocks the specified file from running in elevated context. That enables organizations to work the other way around. Instead of configuring which file elevations are allowed, this enables organizations to allow every elevation with the exception of the elevations of those specifically specified files. Of course, the recommendation is to tightly control which files are allowed to elevate. That is, however, not always the situation that every organization is in. Often simply getting insights into what users are installing is already a huge step forward. Especially in combination with no local administrator privileges. As long as it’s a path forward. Not ideal but definitely serves a purpose. This post will look into configuring a deny elevation rule, followed with the user experience.
Configuring deny elevation rule policy
When looking at configuring a deny elevation rule, it’s all about an Elevation rules policy. That is of course assuming that an Elevation settings policy is already in place for setting the default behavior for elevation requests for any file that isn’t specifically managed by an elevation rule. The most obvious configuration of that would be to require user confirmation and validation for every of those elevations. Combining that with a deny for a specific specified (installation) file, creates the combination that would make the most sense in this case. The following eight steps walk through the configuration of that elevation rules policy for an example application (7-Zip), based on the hash of the file.
- Open the Microsoft Intune admin center portal navigate to Endpoint security > Endpoint Privilege Management
- On the Policies tab of the Endpoint security | Endpoint Privilege Management page, click Policies > Create Policy
- On the Create a profile page, provide the following information and click Create
- Platform: Select Windows 10 and later as value
- Profile: Select Elevation rules policy as value
- On the Basics page, specify a valid name to distinguish the policy from other similar policies and click Next
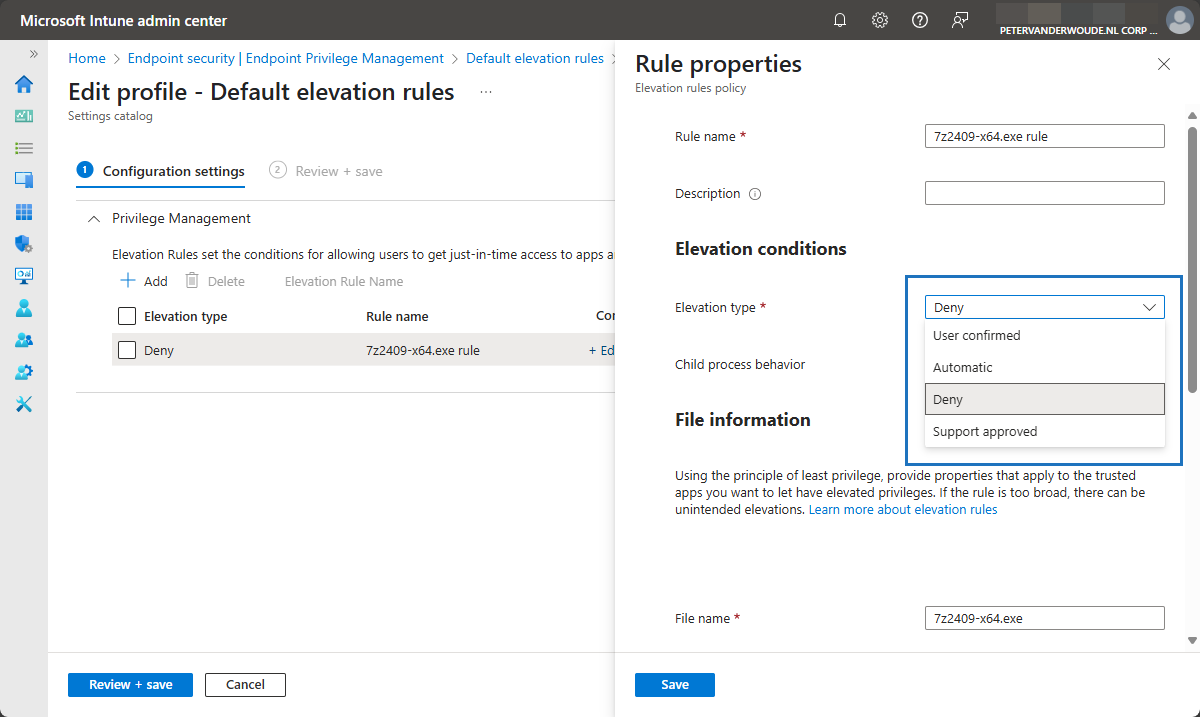
- On the Configuration settings page, as shown below in Figure 1, add a new rule or edit the default instance, provide at least the following information and click Next
- Rule name: Specify a valid and unique name to distinguish the rule
- Elevation type: Select Deny to make sure that this rule will deny the installation of 7-Zip
- File name: Specify the name of the file, including the extension (in this case 7z2409-x64.exe)
- Signature source: Choose Not configured, to not use a certificate to validate the integrity of the file
- File hash: Specify the hash of the installation file of 7-Zip (in this case BDD1A33DE78618D16EE4CE148B849932C05D0015491C34887846D431D29F308E)
- On the Scope tags page, configure the required scope tags and click Next
- On the Assignments page, configure the required assignment by selecting the applicable group and click Next
- On the Create + Review page, review the configuration and click Create
Note: Use Get-FileHash, or the Endpoint elevation report (when using the reporting scope of Diagnostic data and all endpoint elevations) to easily retrieve the hash information of the file.
Experiencing deny elevation rule policy
After applying the configuration, it’s pretty straightforward to experience the behavior. Also, with the EpmTools PowerShell module, it’s also pretty straightforward to verify the applied configuration. So, first verify that the configuration is successfully applied by using Get-ElevationRules, as shown below in Figure 2 (1). And once the configuration is applied, verify the user experience by using the Run with elevated access option in the right click menu on 7z2409.exe, as shown below in Figure 2 (3).
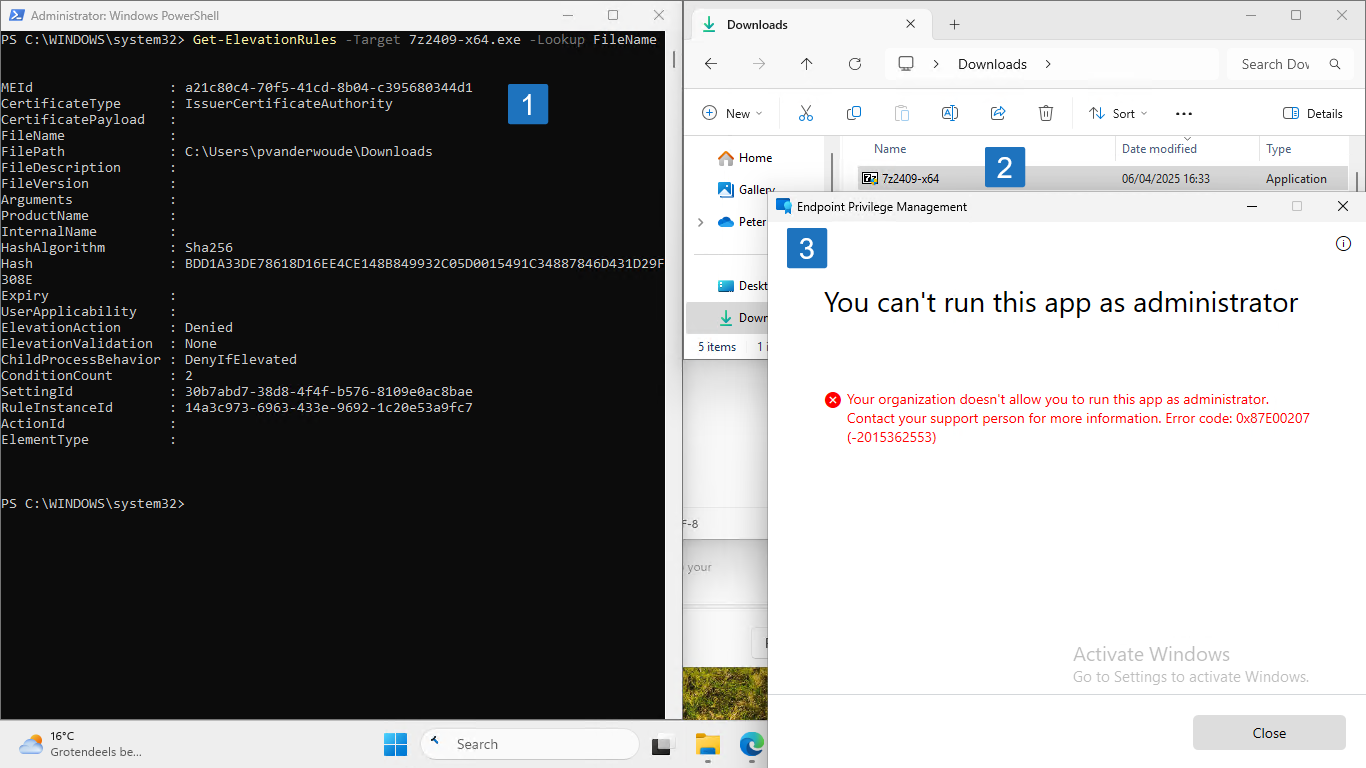
Note: The assigned elevation rules policy will be available as a DAT-file in C:\Program Files\Microsoft EPM Agent\Policies\ElevationRules. That file is readable like a JSON-file and with the EpmTools PowerShell module. Besides that, a reference is stamped in the registry at HKLM\SOFTWARE\Microsoft\EPMAgent\Policies\ElevationRules.
More information
For more information about Endpoint Privilege Management, refer to the following docs.
- Learn about using Endpoint Privilege Management with Microsoft Intune | Microsoft Learn
- Configure policies to manage Endpoint Privilege Management with Microsoft Intune | Microsoft Learn
Discover more from All about Microsoft Intune
Subscribe to get the latest posts sent to your email.
1 thought on “Explicitly denying elevation of specified files using Endpoint Privilege Management”